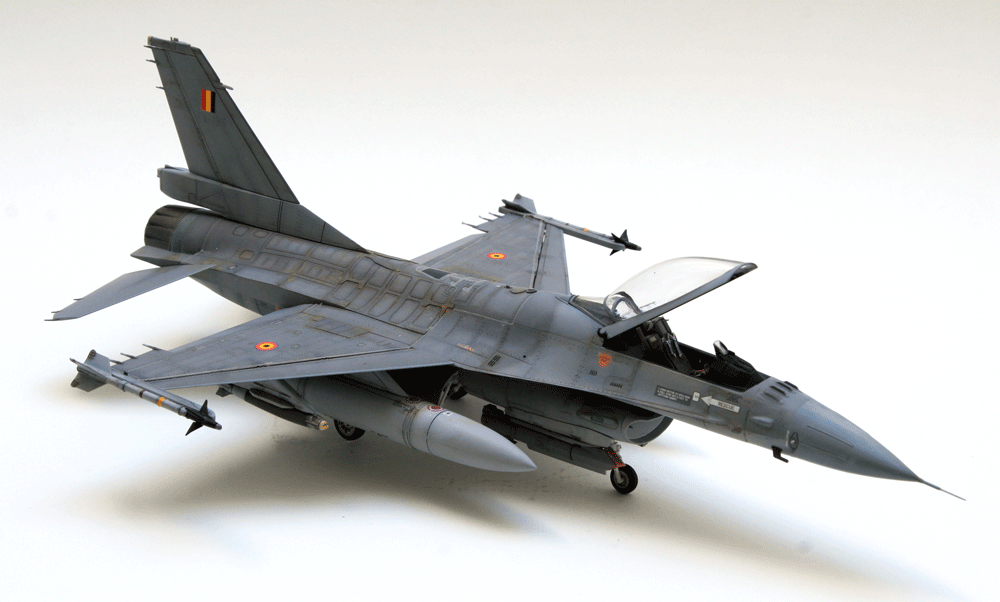
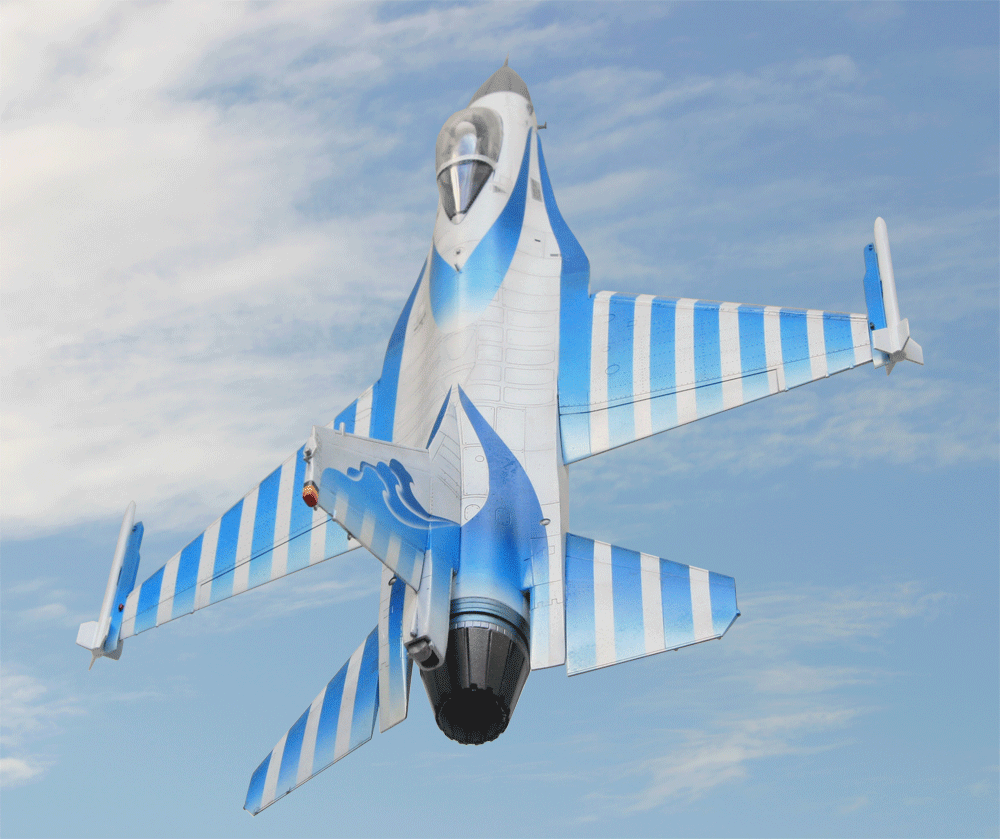
One old F-16A block 15 and one more modern F-16A MLU. The earlier model will be displayed in flight and the later MLU model will be displayed as an F-16 deployed in Afghanistan.
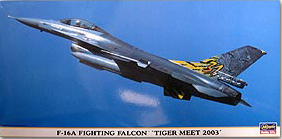
Looking around for suitable models for the project, I looked at the F-16A from Hasegawa but quickly realised that building a MLU out of this wouldn't be suitable - although the decoration provided in the box should clearly be a MLU. No big deal for me anyway as I need an earlier F-16A model.
Looking for a MLU model, I considered Tamiya as it's a pretty sure value, but again converting to MLU wasn't going to be easy as Tamiya does multi version (block 25/32, aggressor, block50) but strangely enough no MLU that I know of. Kinetic came to the rescue with a specific MLU model.

With both model selected; let's get on building.
1. Cockpit
Like most modeller this is where I often start.
Hasegawa cockpit is very simplistic but assembled in a glimpse. It's made of 9 pieces pilot excluded. The pilot is available though and will be used. The IP is the older block 15 while surprisingly the instructions clearly show a MLU IP. I looked deeply in the box of the model, there is no MLU IP included. The differences are very noticeable though, the MLU has two MFDs and an ICP while the block 15 has no MFDs but a SMS panel on the left and a radar screen on the centre console. I don't really care as I'm building a F-16A prior to Mid Life Upgrade, but be warned if you want to build a MLU out of it.
The flight controls are very gross and frankly needs to be replaced (Luckily the Kinetic box offers two sets of Hotas). The seat is very simplistic and oversized and since it's the most visible part of the cockpit, I'd replace it as well with a resin aftermarket.
There is no detail on the sidewall (armrests, canopy spiders, ...) and it's a chance we can not see the rudder because they must be at least 3 times bigger than the real F-16 ones.
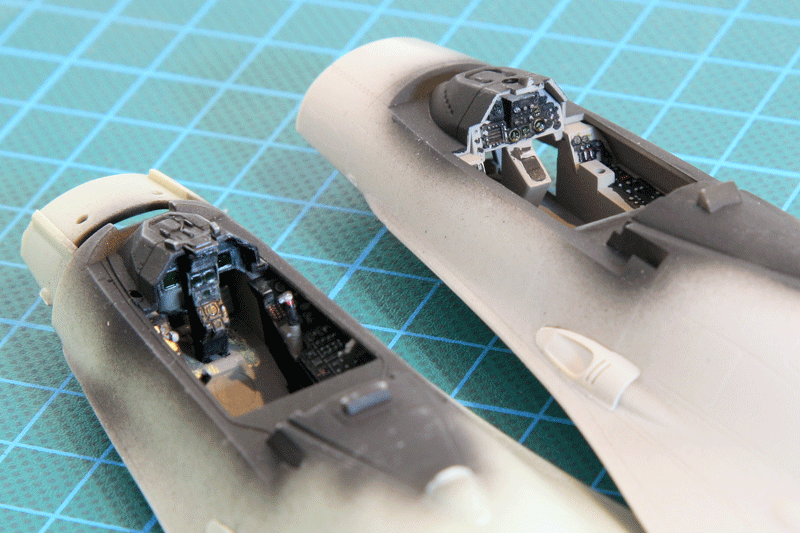
The Kinetic cockpit is much better detailed but a pain to build, especially the seat. It's barely possible to assemble it and even less possible to slide it into the cockpit once assembled...
The surface details of the cockpit are much better than Hasegawa's. The centre panel is accurate for a MLU, except the ICP which is very flat and could use a bit more details.
Flight controls are well detailed and the throttle is provided in the CUTOFF position (lifted almost vertically) which is very accurate for a model with the engine not running. Surface detail on the panel allows easy drybrush to highlight the details. Armrest is supplied but sadly no spider. Since the armrest is on a duplicate tree it easy to create a spider from the extra armrest. As the canopy will be open, the spider needs to be visible.
Cockpit assembly into the top fuselage didn't present any problem. I just had to go against the instructions and glued the IP on the glareshield first rather than gluing the IP on the cockpit floor. The fit was better this way.
2. Gear Bay
The Hasegawa gear bays are very sparse and devoid of detail. Luckily the in-flight display will allow me to close the gear doors on the model avoiding the problem. But there is no question that if I had to build the model on its gear, I'd seek an aftermarket product for the gear bay. Closing the gear doors flush didn't create any issue, which is worth mentioning as it's rarely the case.
Kinetic has a bit more details but as usual the plumbing is lacking. So detailing will be required.
The big gear bay surprise came well after having assembled and painted the model. When I glued the main gear legs in the gear bay I noticed that the aircraft was not level when viewed from the front. The right wingtip was almost 5 mm lower than the left wingtip. Yep, 5mm !!!
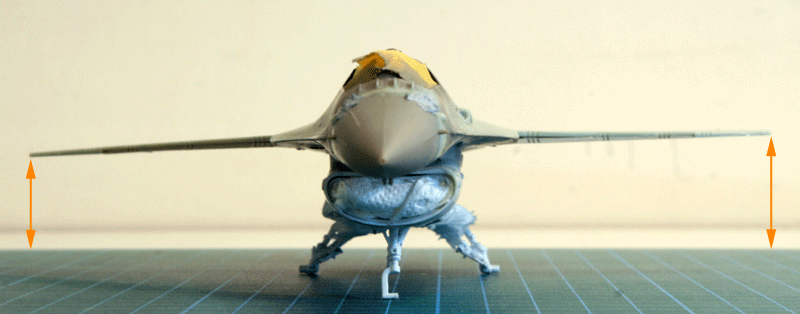
I traced back the issue to the way the main gear bay is attached inside the fuselage. There are 4 square locating pins that needs to be inserted into 4 square holes. I probably wasn't careful enough and didn't test correctly that the gear bay was fitting nicely into all 4 locating holes. It's the biggest issue with this model, the fit of the locating holes are always creating fitting issues. I couldn't correct this one, especially after all the trouble I went through to sand the fuselage smooth after the horrible fit. I decided to leave it and deal with it later on, trying to correct it at the wheel level.
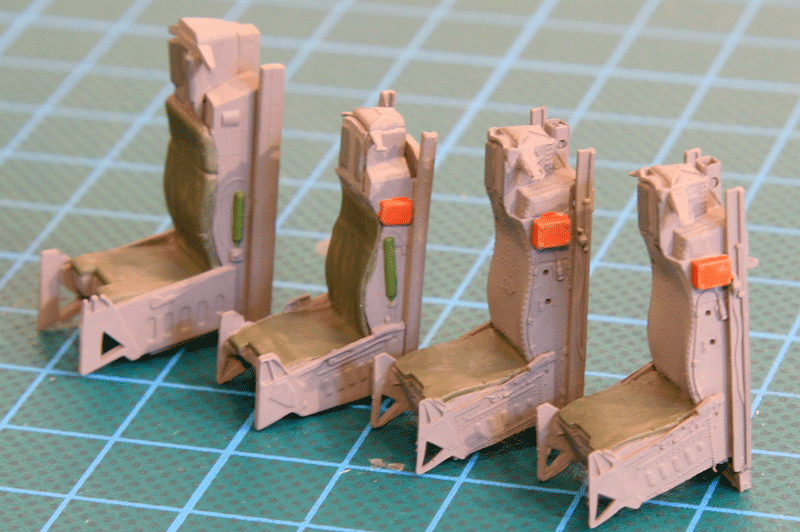
3. Seats
As I said above, both the Hasegawa and Kinetic seats need to be replaced.
- The Hasegawa is oversized and very simplistic.
- The Kinetic is very well detailed but so hard to assemble and it's almost impossible to slide into the cockpit.
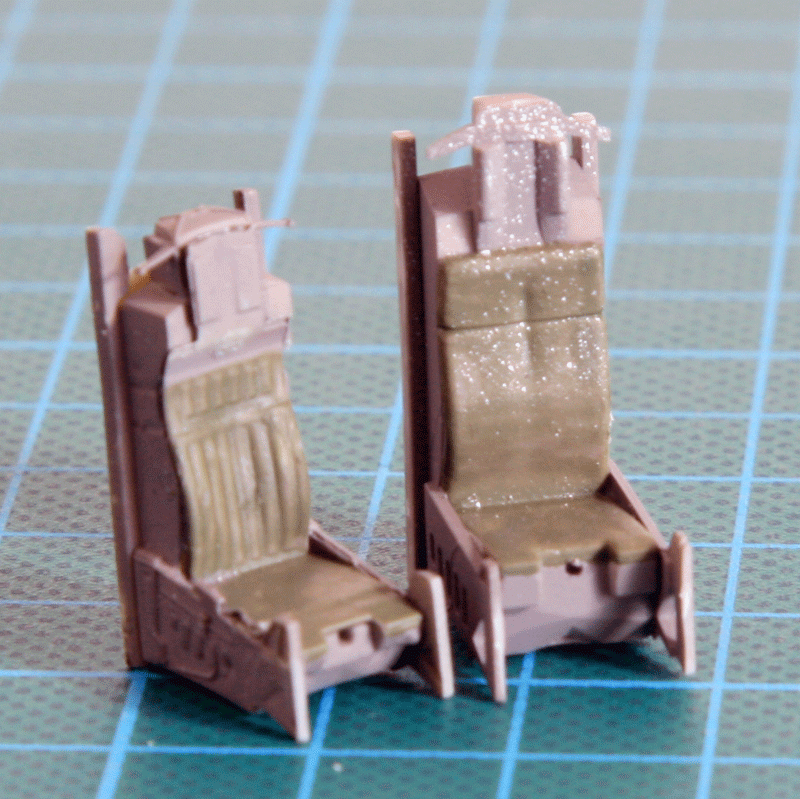
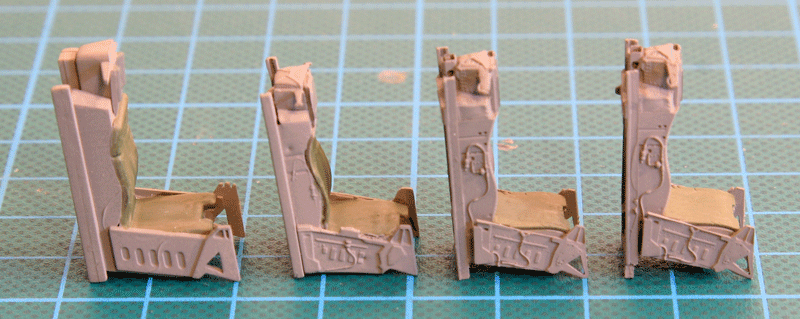
Considering the plethora of aftermarket seats, I chose the Eduard Brassin offering because they had an early and late version of the Aces 2 which were perfectly suiting my early A and late MLU models. The Brassin seats are indeed gorgeous. the smallest details are provided either in resin or PE, placards are full harness are provided. They were quickly assembled and painted. The late model will get the full harness and the early seat will get a pilot seating so the seatbelts will be placed according to the pilot model.
I didn't notice much difference between the early and late style offering from Brassin. To be honest I expected the late model to have the retractable pitot and the early seat the fixed pitot. But no the only difference I could notice was that the late seat had the sheepskin cushion as an option which isn't available in the early seat. It's a shame about the pitot because it is a very visible detail in the F-16 cockpit.
Although the detail is pretty high, I was expecting more homework from Brassin and I was really disappointed with the lack of differences between the two offerings.
I ordered the Brassin seats as well as the late F-16 MLU wheels and the Sniper pod from the Eduard website. The online ordering was very slow and took more than two weeks from Eduard Czech headquarters to my home in Belgium. I'd say there is room for improvement.
4. Assembly
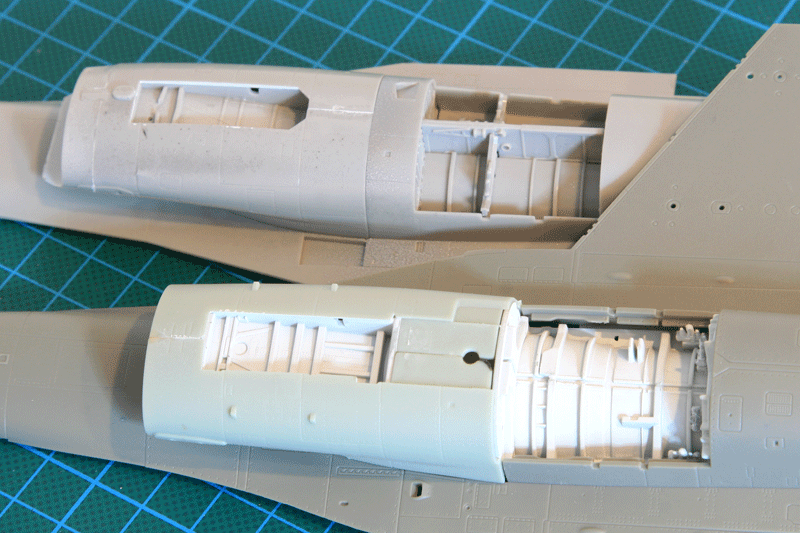
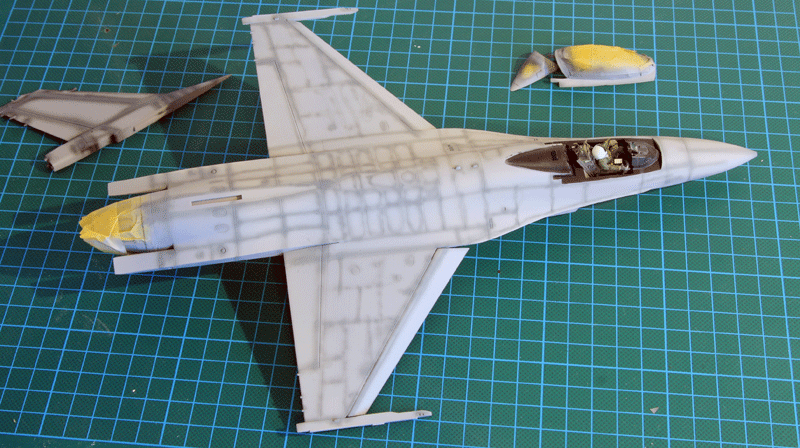
The biggest issue of all F-16 models is obviously the intakes. These two are no different. The Hasegawa (seen left on the image below ends up in a simple plastic wall with no compressor blade visible. It's far from being seamless and the way it's assembled makes it impossible to hide the joints as there is no intake duct. That said, it's not too much visible and I can live with it.
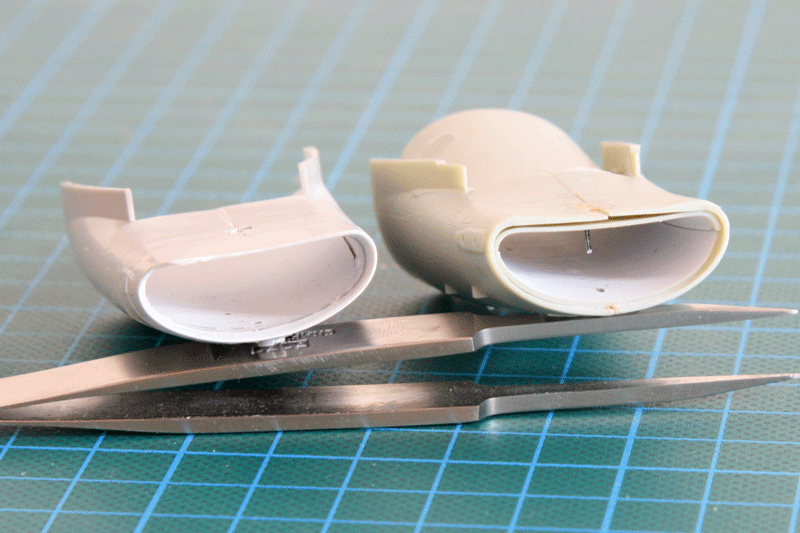
The Kinetic intake is modelled along the Tamiya parts and provide the extra advantage to have the lip separated. That makes the painting process much easier as the lip is usually the fuselage colour inside the intake which is a real pain to paint right. The lip can be painted grey and glued at the later stage providing the perfect contrast between the intake white and the fuselage colour. No hassle solution, perfect!
The Hasegawa model fits nicely and is very quickly assembled. Unfortunately it's a clean configuration with no possibility to lower the LEF (Leading Edge Flaps) or TEF (Trailing Edge Flaps). Well F-16 on the ground have the LEF level or pointing up 2-3° and the TEF can be lowered. But in flight the TEF will most of the time be level and the LEF will be down as the aircraft manoeuvers. Since my inflight display is an airshow model I have to extend the LEF and I can leave the TEF as they are.
Of course the Kinetic offers the possibility to lower both TEF and LEF but that one will be on the ground, so I will keep the LEF straight 2-3° up and lower the TEF.
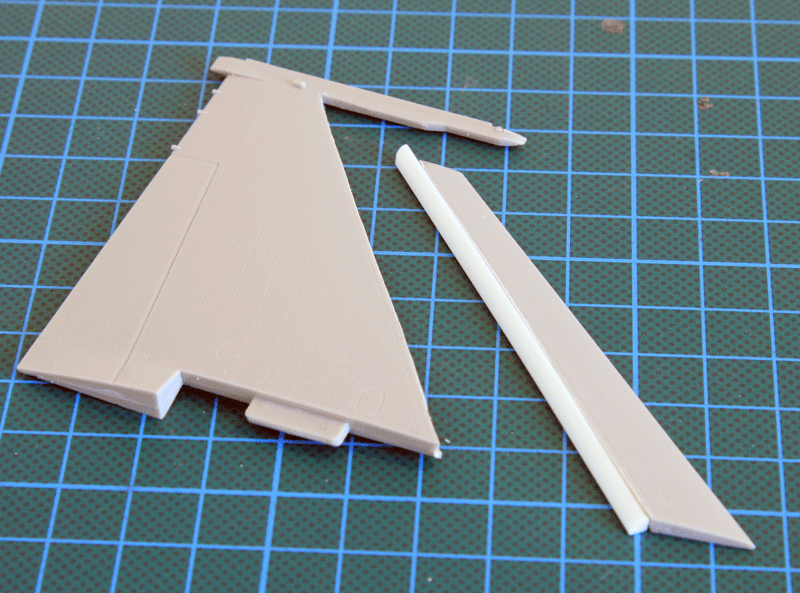
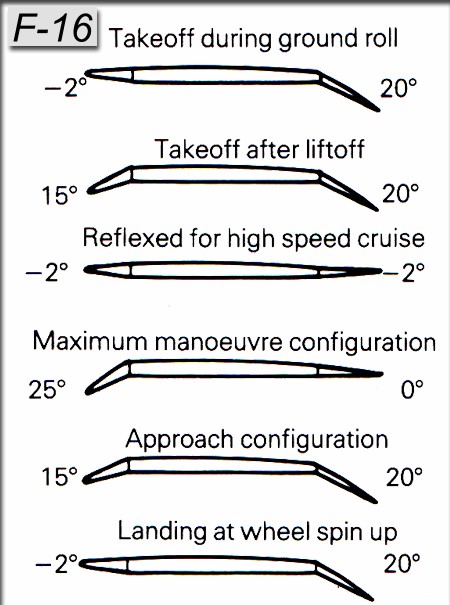
The LEF were cut of the Hasegawa wings with a scalpel after both upper and lower wing have been glued together. A half round was glued to the LEF and sanded to shape. The innards of the wing were sanded with a triangular file and the LEF was then repositioned on the wing in the 25° down position (max manoeuvering). The rest of the Hasegawa model was assembled without further problem.
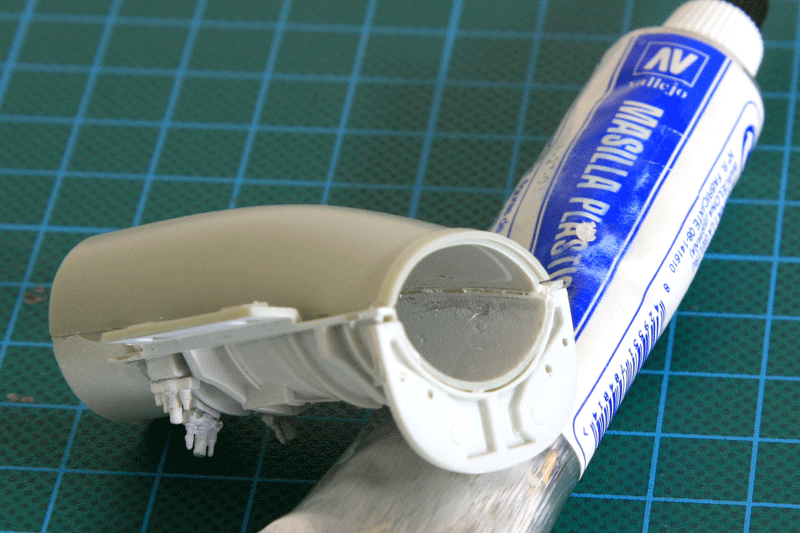
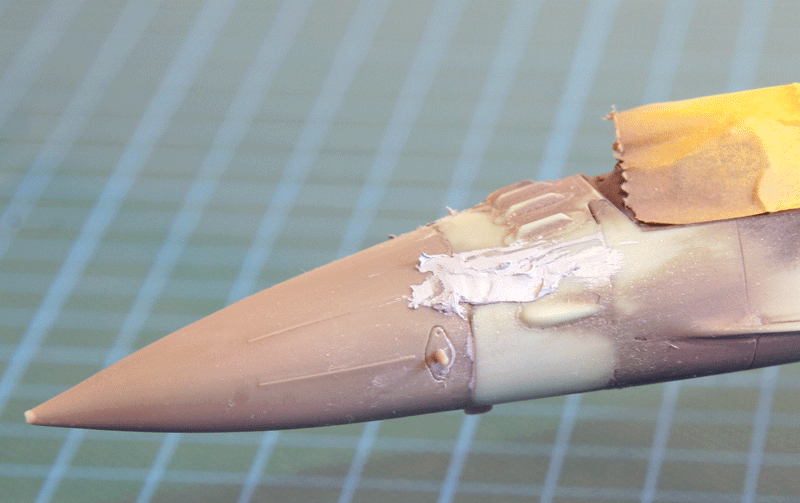
The kinetic assembly was a bit more complicated as expected. The parts are cut in the same way as the 1/48 Tamiya F-16 but not as precise and with a lot of fitting issues. One of them is the very visible joint on the upper fuselage which is cut in two just in front of the AAR door. The joint needs putty and sanding and that of course will destroy the engraving of many panel lines. I usually fix this in two steps:
- I protect as many panel lines as possible with masking tape.
- I then apply putty (usually Tamiya putty) and then clean the excess of putty with nail remover before the putty dries away. This avoids the need for the sanding step but the nail remover will attack the plastic so you can not do multiple passes. Another less aggressive method is to use water based Vallejo putty which can then be swiped flat with water.
The Kinetic wheels have been replaced by Brassin wheels. The Kinetic's are way oversized and that is very visible on the finished model.
The Kinetic canopy is not easy to display open. A lot of thinning will be required on the part supporting the opened transparent canopy.
5. Painting
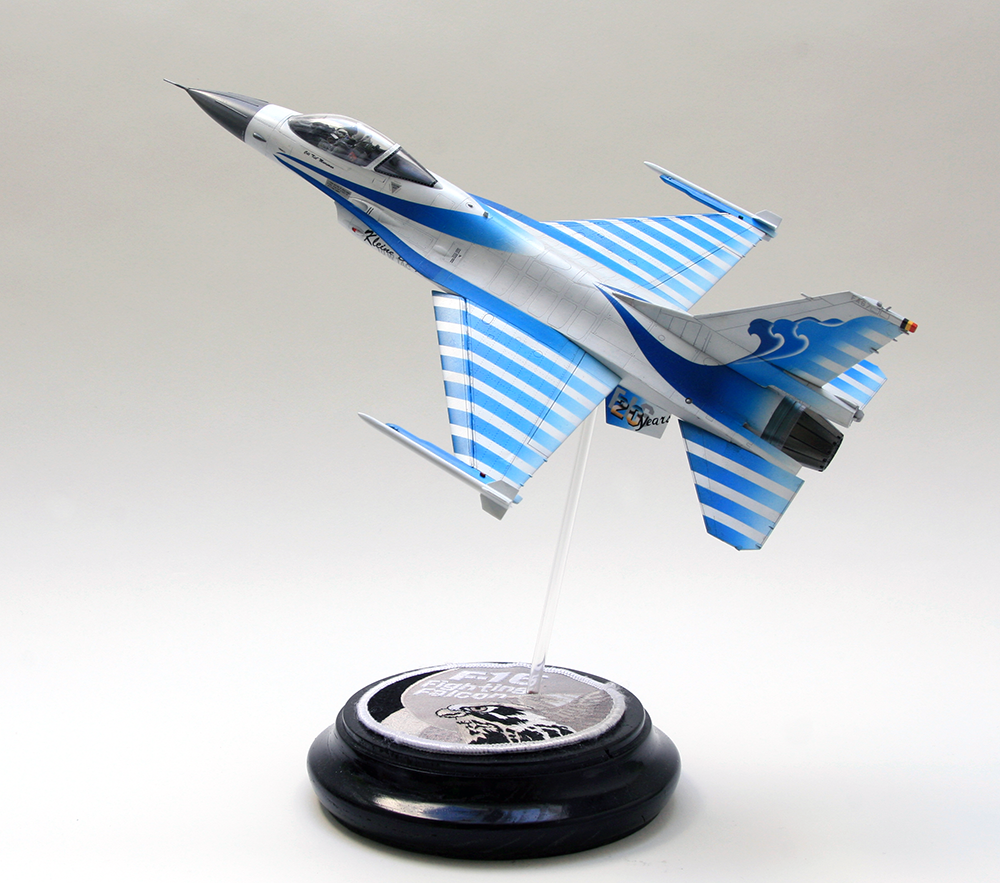
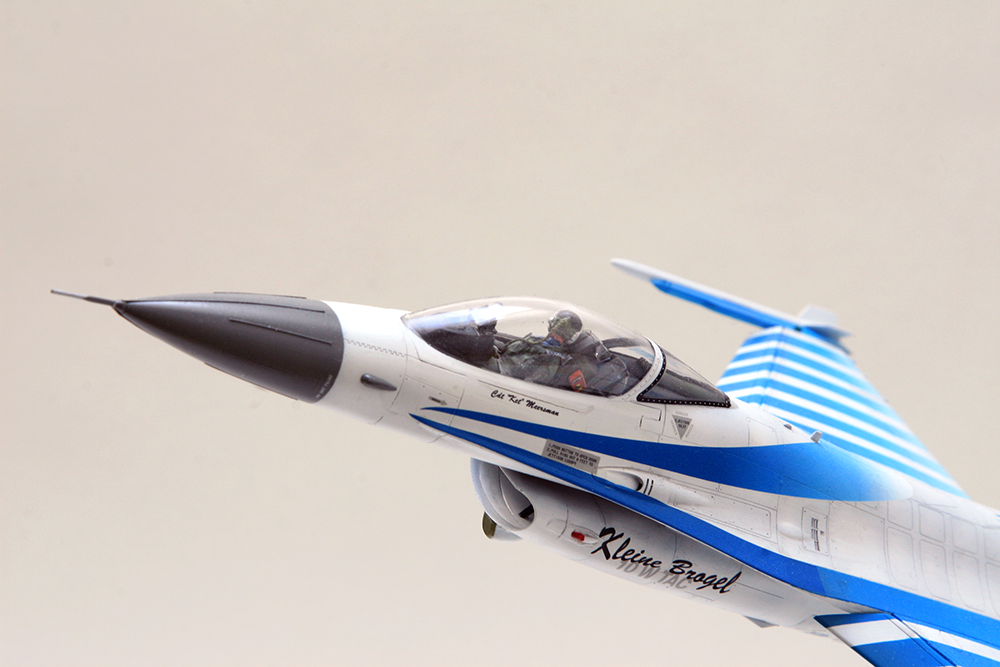
Both model will greatly differ in painting. The late MLU Kinetic kit will be an operational Belgian F-16 in Afghanistan while the early Hasegawa will be a F-16A specially painted as the white falcon for the 1998 airshow season commemorating 20 years of flying the F-16 in the Belgian air force.
Both models received a pre-shade of the panel lines. The white falcon was lightly pre-shaded in grey due to the overall white paint. The MLU was pre-shaded in black as usual.
The cockpit of the Hasegawa model was finished and sealed closed before the first coat of white paint. I used Tamiya XF-2 acrylic paint mixed with X-22 gloss varnish and applied multiple thin coats on the whole model.
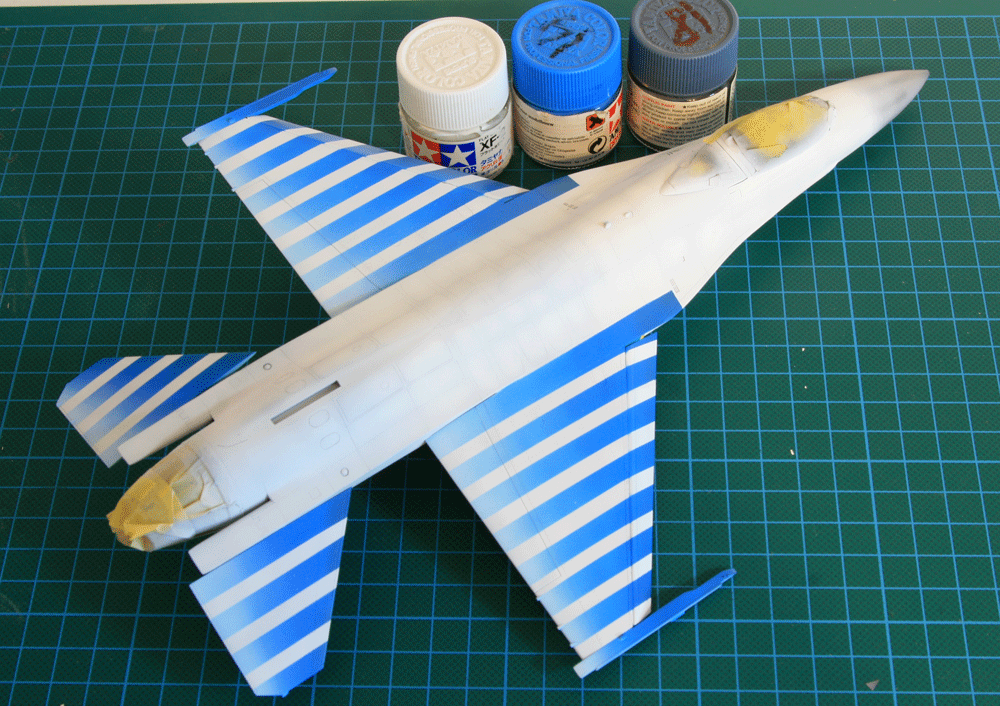
Daco provides a full sheet for the white falcon but I decided to paint as much as possible rather than using the thick decals which will hide many details on the wings and stabs. The big challenge was to paint the colour gradient from bright blue to white.
Using the decals as template, the aircraft was masked and blue paint was spayed. The blue was varying from XF-14+XF18 at the front to pure XF-14 in the middle and XF-14+ white close to the trailing edge of the wings and stabs.
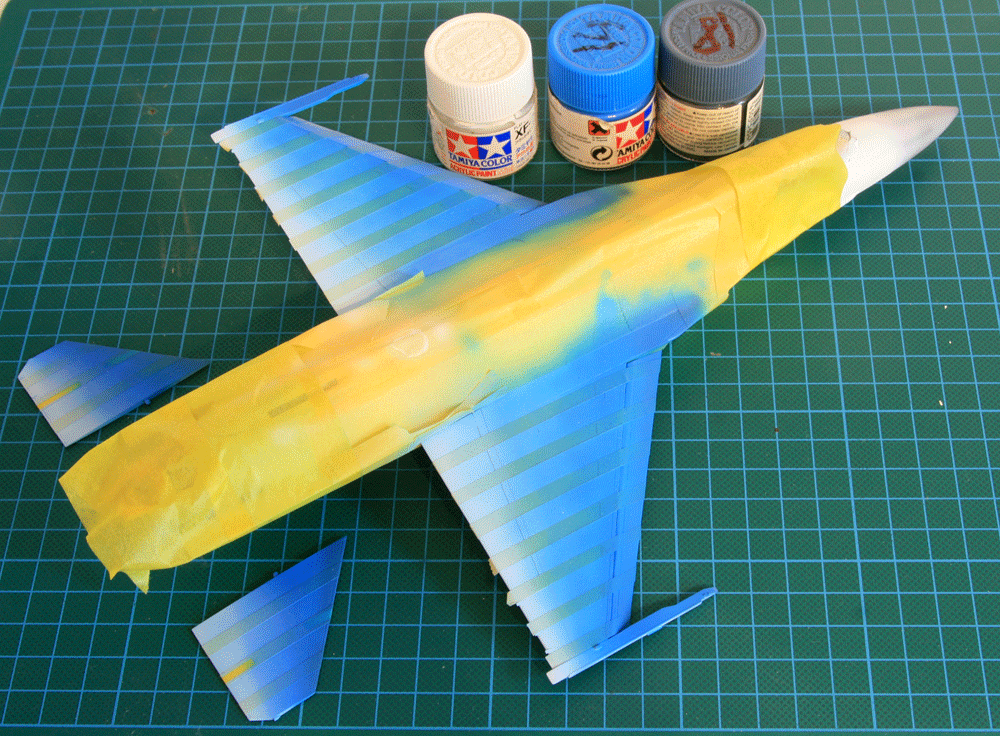
The nose of the aircraft was painted with Gunze H307 & H317 which contrasts nicely with the white overall paint. The model received a very light wash of brown before the final coat of semi-gloss varnish was applied.
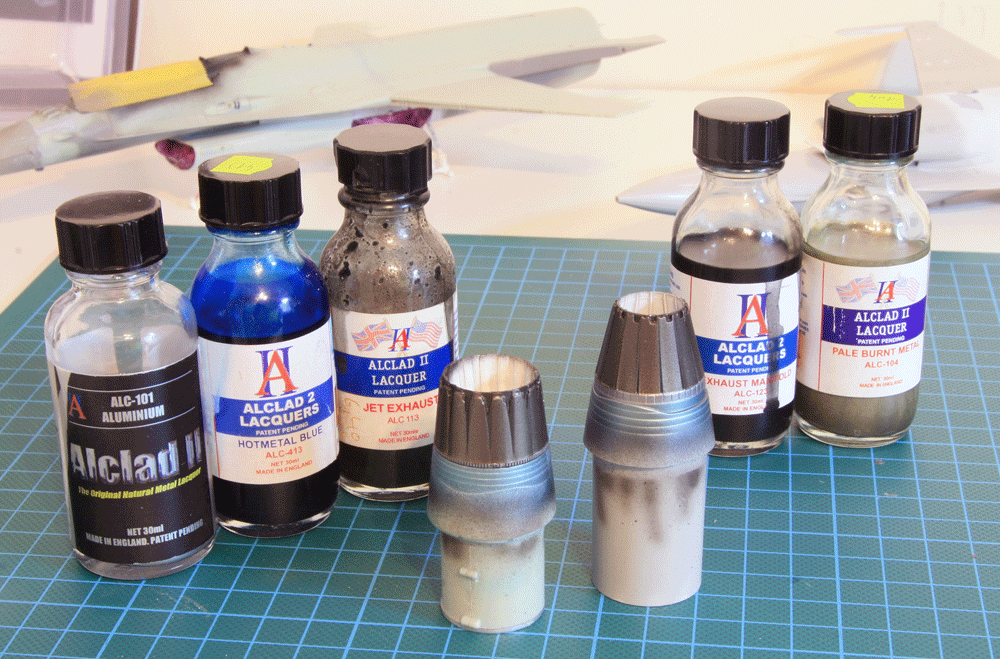
The Hasegawa exhaust was replaced by a closed nozzle found in the stash box. The Kinetic exhaust was deemed good enough to be used as is. I painted both with variation of alclad starting with aluminium, then hot metal blue. The nozzle itself was given a coat of jet exhaust and exaust manifold then masked and a mist of pale burnt metal was sprayed. This technique leaves the part of the petals that are not visible when the nozzle is closed darker and gives a nice depth to the part.
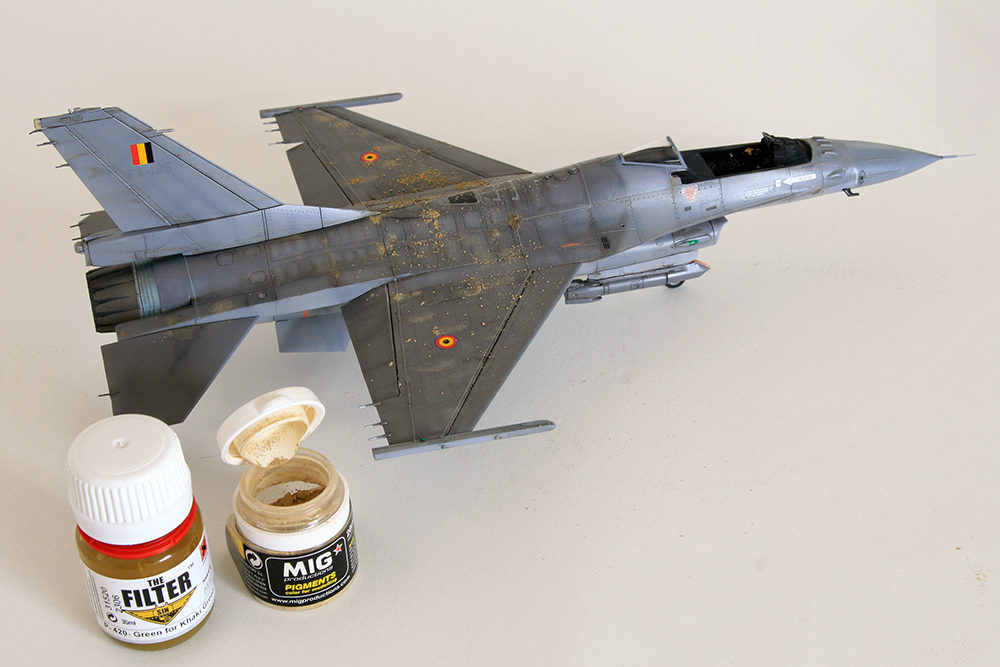
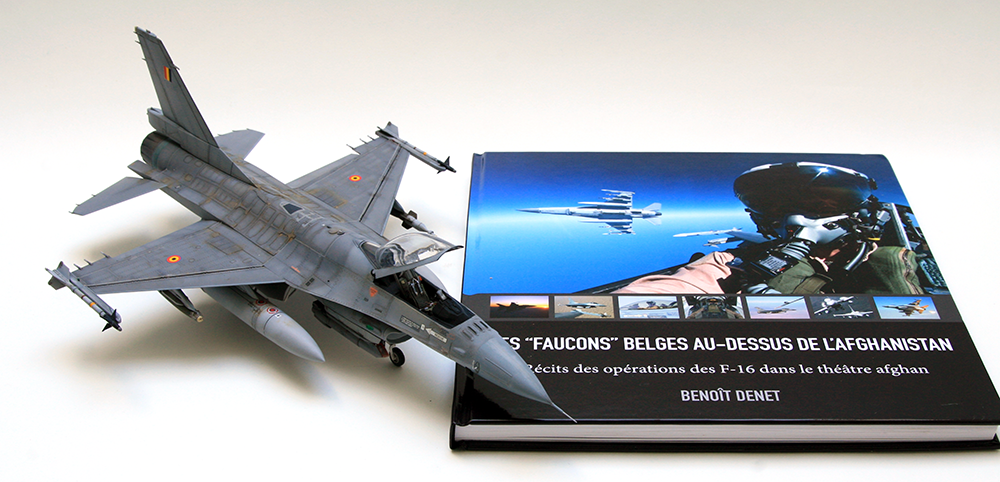
The MLU was painted in the usual F-16 grey, which for Belgians aircraft is still the old 3 tone greys: H308 for under surfaces, H306 for intake top and tail and nose section and H305 for the top fuselage and wings.
After painting the model was directly weathered with different shades of grey giving an operationnal status to the airframe. Inside panels were painted with a lighter shade of grey and then the different colours were subtly blended together. Decals will be again provided by Daco which are always a bit on the thick side and prone to silvering. So heavy gloss varnish will be used before decaling.
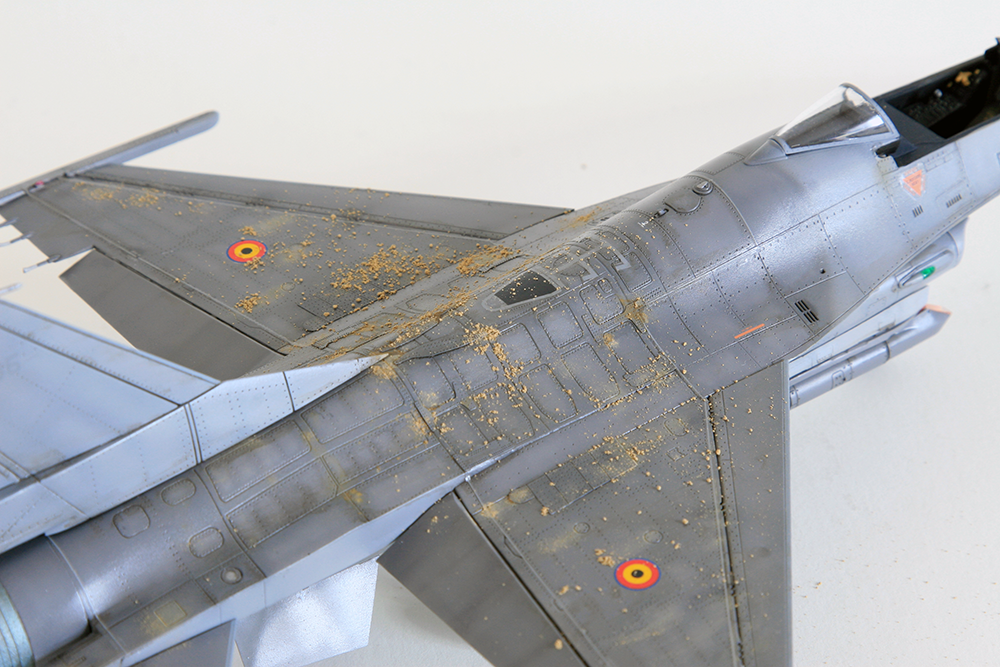
The model received the usual dark brown wash before a very specific filter of yellow and light brown dust pigment to replicate the very persistent wheat flour like dust of Bagram airbase. These Afghanistan specific weathering were mostly concentrated on the top central surfaces of the model.
6. Weapons
Obviously the white falcon doesn't have any weapon. The kit's sidewinders were quickly converted to smoke-winder by simply removing the forward fins. Normally the smoke-winder are larger than the sidewinder and needs a specific exhaust but I didn't bother for this occasion. Luckily I chose an airshow configuration because the Hasegawa boxes don't include any offensive air to ground weapons.
The operational airframe carries the usual CAS load of the Belgian F-16 in Afghanistan. Two wing bags, a GBU-12 laser guided bomb and a GPS guided J-DAM on the PIDS pylons, two AIM-9 sidewinder (you can hardly see BAF F-16 carrying two in Afghanistan) and the Sniper targeting pod on the right chin pylon assembled and painted according to Brassin instructions.
The kinetic kit includes plenty of weapons which are very welcome for this and future projects.
7. Conclusions
The Hasegawa kit comes with no surprise and except for my in flight requirement was very easy to build. The kit though lacks a bit of flexibility which basically shows its age. Cutting out the LEF wasn't the easiest thing to do but tremendously add to the dynamic pose of the model. Another challenge was to source a closed nozzle for a dry thrust aircraft, but I was lucky on that one.
On the other hand closing the gear doors and the canopy didn't pose any real issue, which is quite uncommon. The biggest issue of the kit regardless of the configuration is the intake as it is often the case.
Sure the finished model has flaws and it's far from being perfect, but it came close to never being completed.
The book on the picture above is a great ressource for the Belgian F-16 operations in Afghanistan and helped a lot with choosing the correct configuration, weapon and weathering. I probably couldn't finish the model without it.
Not only for the documentation it provided but mostly for the account of the guys being there that kept me interested and focused on the difficult model.