I'm often asked how I do custom decals, so I'll try to explain how I do it in step by step, using a 1/48 Fonderie Miniature Fouga Magister build as an example.
Here's the challenge: Nobody ever made 1/48 Belgian Fouga decals for the last part of the flying career of the birds.
Fonderie Miniature has a boxing with the Belgian Fouga but it seems to be for earlier Fougas and seems to be not quite correct anyway.
As far as I could check, Daco, the belgian decal specialist, didn't do any Fouga sheet either.
Since I have a Belgian Fouga to do - I need decals and since I have to make them myself, let's do one of the two last flying turtles, the most famous MT-35.
Prerequisite: What do you need?
- MANY picture of the real bird you are trying to make decals for. Airliners is usually a great source but I prefer to use my own pictures. When I go to air shows, I not only concentrate on the airplanes like everyone does but I snap pictures of the tiniest details on specific aircraft. Planning homemade decals starts right there. Take close-up pictures of logos, markings at a straight angle, without any perspective (or the least possible)
- Obviously a DAO software to create the decals and the basic knowledge to use the software. For many of us, that's where the problem starts. Well it is not easy. But it comes with experience, so if you never try, you'll never succeed. Decal work is usually basic features of those software so all motivated ppl should be able to start and get great results after a minimum of training with the software.
I use photoshop, but paintshoppro and illustrator are two other suitable software. - Blank decal sheets. White and transparent. You can find them in most hobby stores nowadays and although most were done for laser printers, we start to get specific sheets for inkjet printers.
- So obviously, you need a decent colour printer. I have a laser colour printer, but as said above, inkjet works great nowadays as well.
- a 3 view drawing of the bird you're needing decals for is welcome. But it has to be accurate to your model. Another way is to scan the parts real size. That will be used a s a template to check the decals height, length, etc etc.
- Your usual modelling tools and patience.
Let's get started with point 1, collecting pictures.
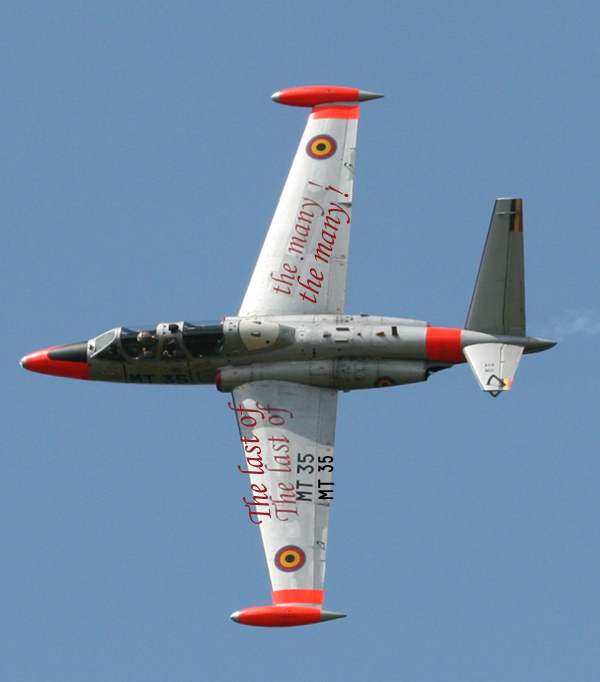
Here's the kind of pictures you'd need - those were taken at various air shows from 2007-2009 when the MT35 & MT37 Fouga were all over the place :)They have been resized for the forum, but do keep them hi res obviously.
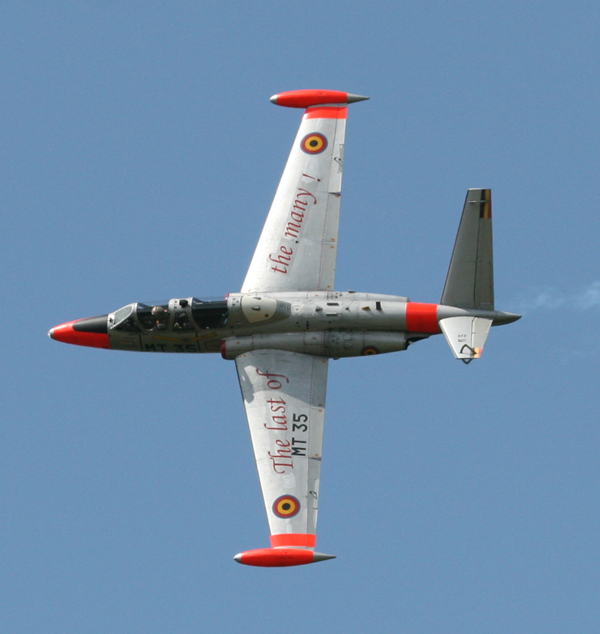
Well, I can post dozen of them, but I guess you have the picture already :)
Now, real images are great, but you'll need to be able to use those in your DAo software. And you need a starting point. That starting point is a scan of the instruction sheet or any 3 views drawing of the airplane you're needing decals for.
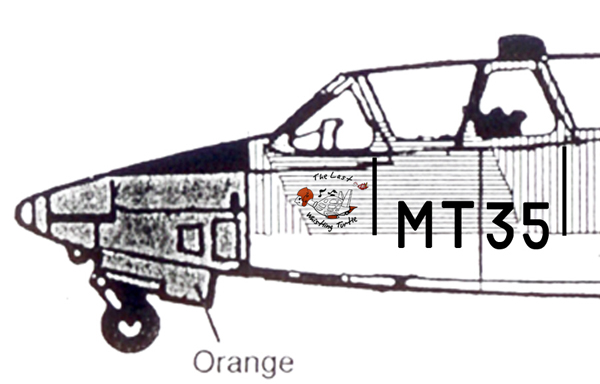
In this very example I scanned Fm's instruction sheet where there is a nice 3views of the Fouga.
But before doing so, one small comment about resolution:
Decals can become quite small and you'll need a hi res image to be able to write small stencils in 1/48. So you need to ensure that your basic template is hi resolution. Usually computer images are 72 dpi (dot per inch) for decal work, i never work lower than 300dpi.
Wanna see why?
The next sample is a 2mm serial number, that's the one going on the wing fuel tank. The left picture is the 2mm at 300dpi and the right oine is the 2mm at 72dpi.


Usually, 1/48 is minimum 300dpi. 1/32 could be lowered to 150dpi depending on the artwork.
That is important to start as early as possible with a 300 dpi file, so when your scan of the instructions comes out of the scanner, ensure you enlarge them to 300dpi (if you scanner couldn't print at that resolution) Even if the files so enlarged aren't very pretty, that's not important, as they are used only for template work...
Here's the scan of the FM 3 views drawing:
Sizing up the template with the dimension of your model.
Scanning a paper document, or using real pictures you took at airshows are all from different sized and they need to be set on the same reference so they can be used all together.So you have
- a scanned 3views drawing at 300dpi
- your air shows pictures
- your model.
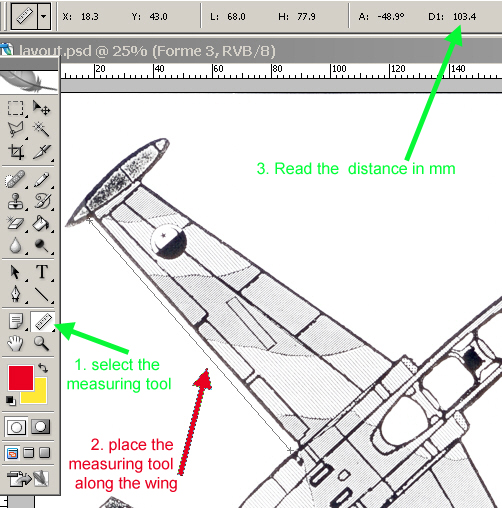
Obviously, the first step is to ensure that your 3 views drawing is the same size as your model!
Once again, that's easy. Or you used scaled drawings and they already are realsize or you need to adjust them yourself.
How?
in my scan above the Fouga wing measure 7.6cm length. My Fouga model wing in 1/48 is 10.3cm long.
So 10.3/7.6=1.355
Enlarge the 3 views drawing by a factor of 35.5% and recheck the distances of both wings, you should get something like 10.3mm on paper and 10.3mm on the plastic.
Sure the quality of your template isn't better, but who cares... :) the precise stuff comes afterward.
but this STEP is PARAMOUNT for the future of your decal work. If you realise later than you're not working on the same scale, you'll have to start from scratch.
that being said, I often print the WIP decal artwork and check them against the 1/48 model for accuracy and fine tuning ...
As for your air show pictures, they are usually hi res pictures, the kind of stuff you could print on a poster, so they will be always bigger than your 1/48 scaling down, so keep them at their native resolution, that's more than enough. We'll scale them down later anyway
The font problem:
Obviously, one of the main aspect of decal work is to use the relevant fonts.Of course, it is quite possible to work with graphics instead of fonts but the good thing about fonts is that they are vectorized (while graphics are usually not) and that means that fonts can be decreased, increased in size without any quality loss. So for me, font use always has the upper hand on graphics.
Military fonts are usually well known and when doing some custom decals, you'll end up inevitably with a small collections of specific model fonts.
The most well known are:
- Amarillo & USAF stencils for USAF
- Longbeach for USN
- Futura, USAfonts for general purpose
- RCAF6 for Canada
- Luftwaffe_fonts for german WW2 aircraft
- RAFstd for RAF fonts
- ... etc etc
Some are available for free, some are for sales. But usually it's easy to find them on the web, most of the time for free.
Coming back to the Fouga example, this presented some font challenges:None of the two fonts I see there are usual model fonts and I have none of them.
I started my research by enlarging the above image to 300 dpi and to the real size of my 1/48 fouga (remember the wing at 103mm?) and typing the same text with different samples of fonts installed on the computer and there, luck striked!
The large commemorative wing marking is a normal windows font: Monotype Corsiva.
One problem solved.
The next one was going to be a little bit more complicated!
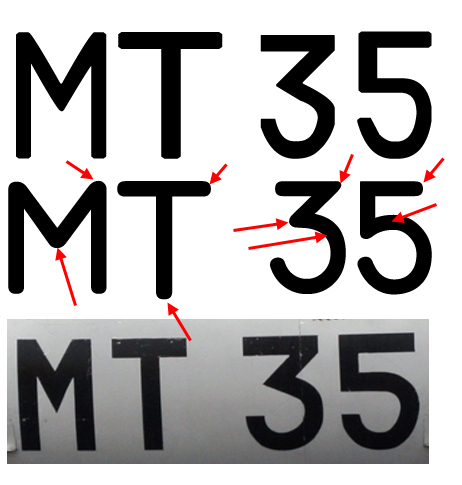
The aircraft code for the Fouga (in this case MT 35) are very special.
Google being my friend, I finally found that the belgian military don't have a font for the Fouga codes. They paint each marking individually from masks and that explains why no two fouga have the same font for their codes.
That obviously is a work for graphic code instead of fonts, but no - that's just not how I work, so I continued my font quest comparing different samples and came to the conclusion that one of the font I use often is very close to the MT35 font: Technic bold.
Many would find it close enough and I would agree. but the rounded edges of the technic font didn't hack it for me, so I decided to modify the font technic bold and create a specific font for the MT codes. To do that I use font creator, a small software allowing to create your own fonts, but that's outside of the scope of this tutorial.
Most of users would be pretty happy with using the technic bold font as it is, especually since when scaled donw to 1/48, the default are not that much visible anymore.
The rest would probably draw the MT codes in illustrator as graphics simply - which I reckon is my second best choice.
Anyway, here's the ongoing work on the fouga font: below is a picture of the code, in the middle is the technicbold and on top is the homemade foga font.
Not there yet, but we are close.
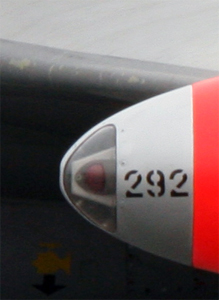
The final font problem was for the smaller serial found on the wingtip tanks and at the rear end of the aircraft. This while easily found on google while researching the MT code issue; It's a free font called Phantom_stencils.
With the font issue solved for now, let's move on to the logo and graphics needed for the decals
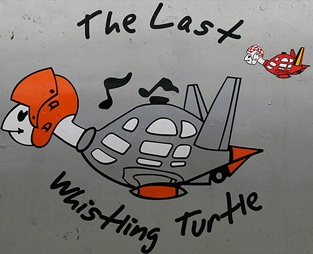
Beside the letters and numbers, we'll have to deal with many different things like the turtle logo, the rescue arrows, the flags and eventually the stencilling.
Well, obvioulsy, use your decal scratch box as often as possible and whenever possible, but if you don't have the relevant decals, well you can always create your own.
In this case, the turtle, wolves, rescue arrows, step lines will be created on the homemade decal sheet.
When you have the luxury to have good pictures, it's again easy with a minimum of photoshop work:
Let's have the turtle as an example:
Open the image in photoshop and start by simply removing the background colour with the magic eraser tool:
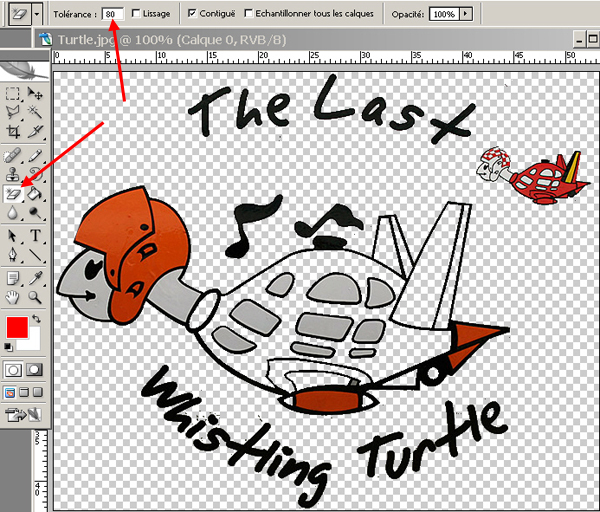
That will remove the silver grey from the picture the two arrows on the above image point sto the magic eraser tool and the tolerances you need to apply to have all the background removed at once, while keeping the details in the other colours. The process is rather simple but sometimes you may have to proceed in multiple steps. Don't be overly concerned with noise remaining after the operation, the logo will be further reduced.
Once you're satisfied with the result, copy and paste the logo into your 3views drawing. That's where the logo will be scaled down and placed on it's correct location:
Obviously, you'll need to use photoshop layers for such new graphics. that will ensure that the turtle remains independant from the rest of the layout and can be moved, resized etc without influencing the rest of the image.
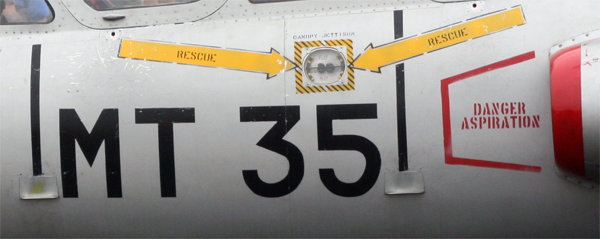
The yellow rescue arrows could be created the same way but they are better done with the line tool.
Insert the reference picture over the 3D view, scale it down so it match the template.
select a yellow colour (always use darker than the reference colour, i'll come back to that later) and select an arrow to be drawn at the end of the line.
The next step is to choose the correct line width, matching the arrow in the picture. No secret there, you'll have to try until you find it. Same is true for the geometry of the arrow.

Let's now have the rescue text in there
Select the text tool and a black colour. Select the Phantom stencil font and type RESCUE
Size accordingly and then rotate the whole along the inside of the newly created yellow arrow.
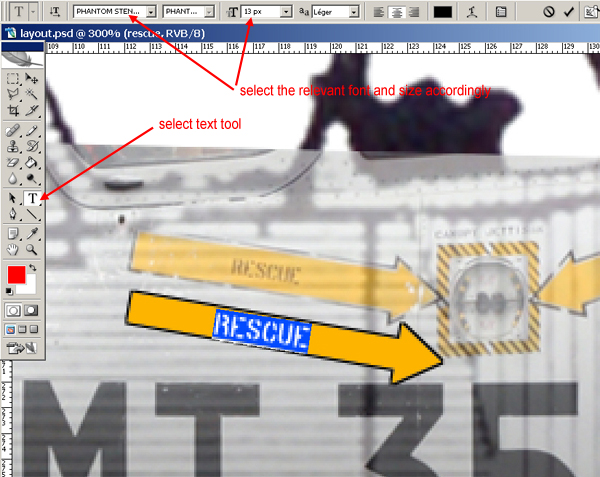
Repeat the whole process for the second arrow.
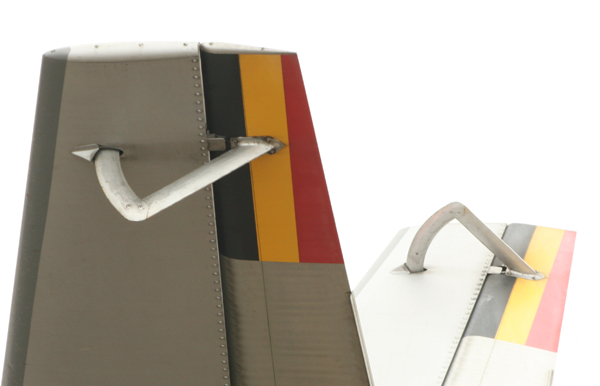
The wolves on the tail are done with the same method as the turtle logo. The flags can be made as well or can be painted.
The dreaded white problem
Most printers can't print white because most of the paper we use for printing is white. So unless you have an ALPS printer, you can't print white on a transparent decal sheet.That is obviously a problem for white drawings, but also when you need to design a clear colour decal that will go on a dark coloured model. Like a yellow rescue arrow on a SEA camo.
Well the solution to that problem is to buy a new stock of sharp scalpel blades, because you are going to need it.
Indeed, the only "easy" solution is to print your artwork on a white blank decalsheet instead of using a transparent one.
Doing so you will provide your artwork a dense white coat as a base which will hopefully provide enough blanking against your dark paint.
The problem is that you will have to cut very close to the edge of your artwork once the sheet is printed to avoid white edges on your decals... That should be easy for the rescue arrow, but it sometimes near impossible to do on more complicated designs.
Another possibility, when you don't have a white decal sheet or when you really can't cope with scalpels, is to paint the area where the model must go in white on the model.
Again, that's easy for some things, and impossible for others.
So if you have to do this, you'll have to split your artwork in two separate prints. One on a transparent decal sheet, the other part on a white decal sheet.
No need to make your life harder by printing black letter on a white backround and have to detour them before applying to a green camouflaged model
That's why it is advised to always have both kind handy.
In the case of the Fouga, i didn't have too much concerns as the prevailing aluminium colour should be light enough to allow the yellow of the rescue arrow to be visible. It might have been a problem for the belgian roundels but luckily, i'll be using roundels from another belgian aircraft decal sheet.
The flag on the tails on the other hand will be prepainted white on the model, before the transparent printed decal sheet is applied.
The turle has some white spots, but I won't be concerned with those and i'll let them transparent, so the whole decal sheet can be printed on the transparent decal.
So usually a mix of different techniques is required to overcome the lack of white in our printers. Ultimately, get a friend who owns a ALPS printer, that works quite good as well

Blank fitting
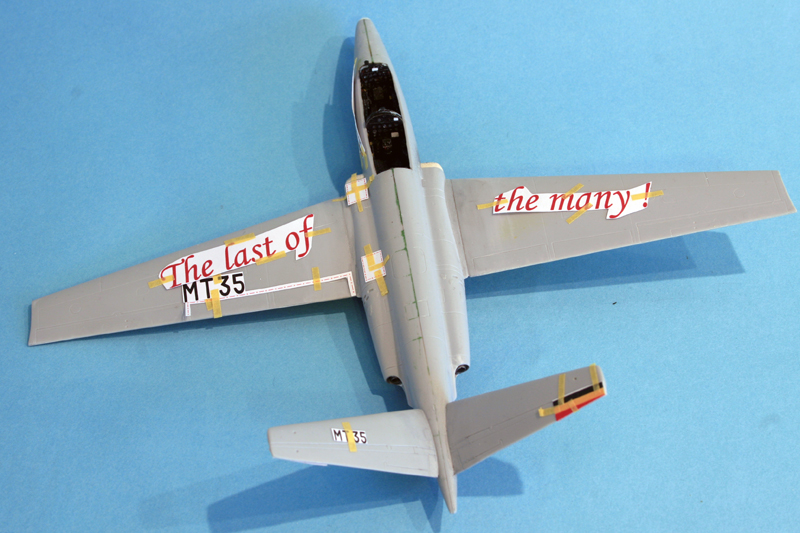
Once all the artwork is done, I usually then print the whole decal sheet on normal paper and I run some tests on the model to check scale, distance, ...That is particularily useful when you're trying to design a decal that goes along panel lines, like the no step area on the flaps on the Fouga for instance.
It was also worth checking the height of the MT35 serial and the flags for the tail to ensure that the white painted area would match.
I usually do this on a cleanly assembled model, prior to any painting.
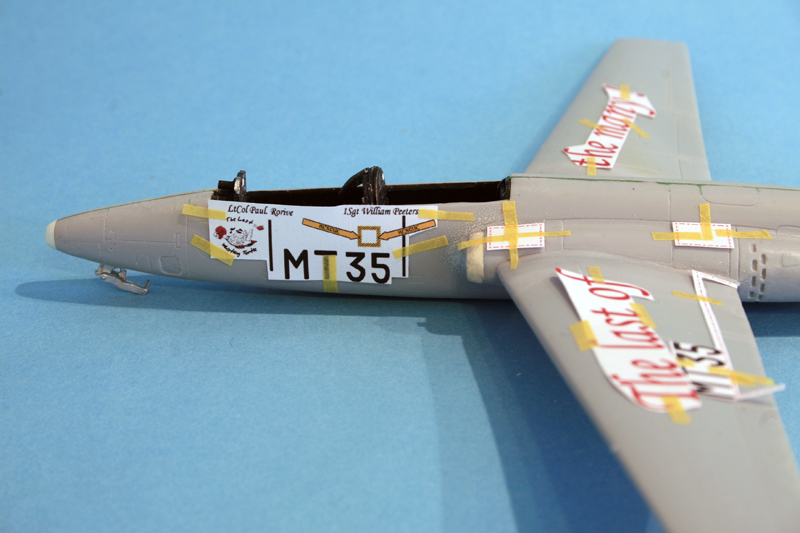
That's also when I decide which decals will stay together on the same piece of film or which ones needs to be separated.
I this case I rearranged all the decals on the left nose so I could use one bigger piece of film instead of multiple small ones. The black vertical lines needed to match the feet recess in the fuselage

Back end seems fine...
Printing the decals
At this stage, I just close the computer and enjoy some airbrushing on the model :)And eventually I'll grab my courage with both hands and after numerous last change and many draft prints on white paper, I finally place the expensive decal sheet in the printer (and pray that my wife doesn't send something in the queue from her own computer to the networked printer :) ) and I send the image to the printer.
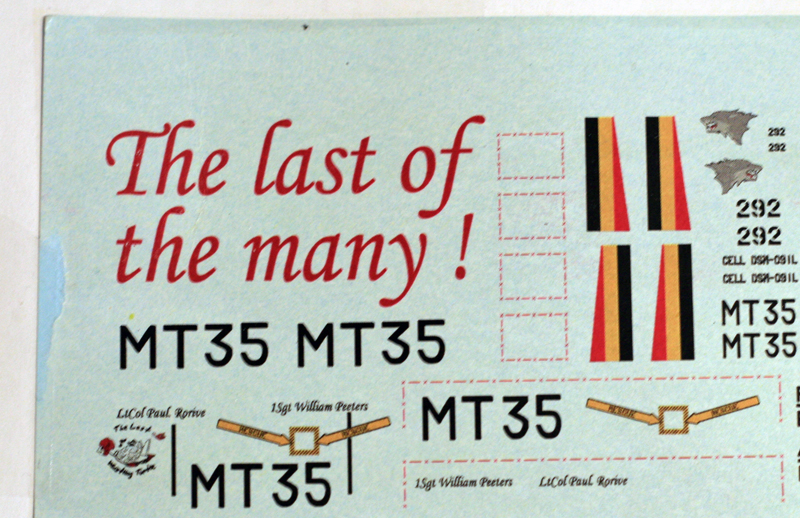
That's what comes out of it, it's blurred ok, but that's my photography skills, not the artwork :)
Don't let the freshly printed decal too long without protection. I usually very quickly coat the whole decal sheet with two or three very thin coat of clear varnish.
I use whatever varnish I have on my hand, usually X22 acrylic from tamiya or H21 from Gunze.
I tried also microscale liquid decal film, but I had mixed results when sprayed and I reverted to plain gloss acrylic varnish.
Then I let it dry for a rather long time.
So the Fouga is now painted, gloss coated and ready for the decals.
The homemade decals are usually more fragile than the commercial ones . See the damage in the last of the many print ?
Depending on your amount of gloss coat on the sheet, they might also be very thin or very thick ! you decide there.
Care should be taken when you cut the decal sheet not to attack the decal itself.
When your decal is quite thin, you might ruin it by cutting too close from the artwork. But on the other hand the edges are thin and transparent so you can take an extra security margin by cutting an extra millimeter from the artwork, it will remain invisible on the model.
If it's thick, you can cut closer but you risk seeing the film on the finished model.
As always in modelism, you have to find the right balance.
The rest is decalling as usual. Applied on the glossy surface, they go very well and react nicely to microsol and set. Then they are protected with another coat of gloss before weathering.
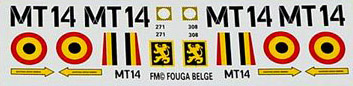
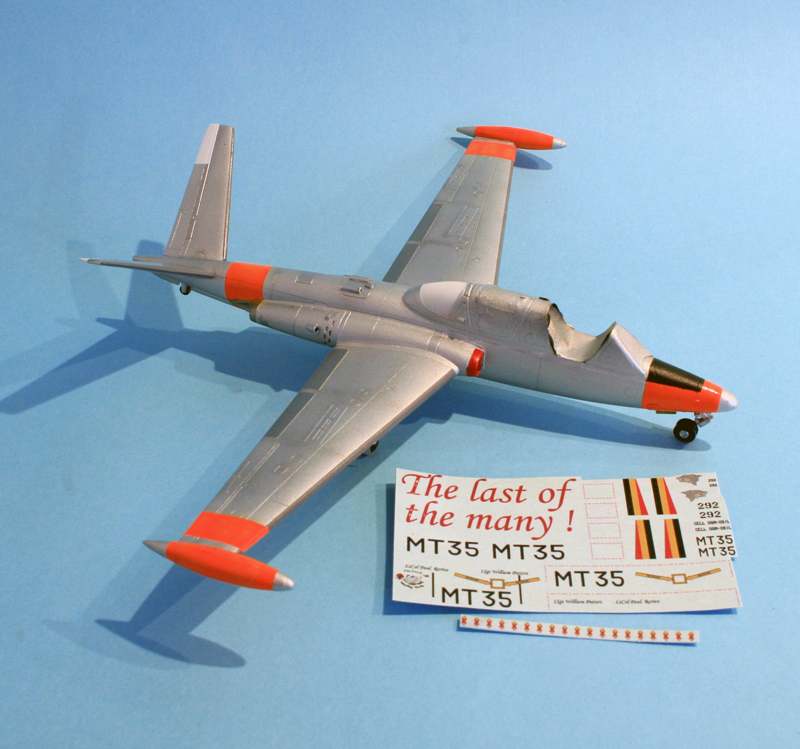
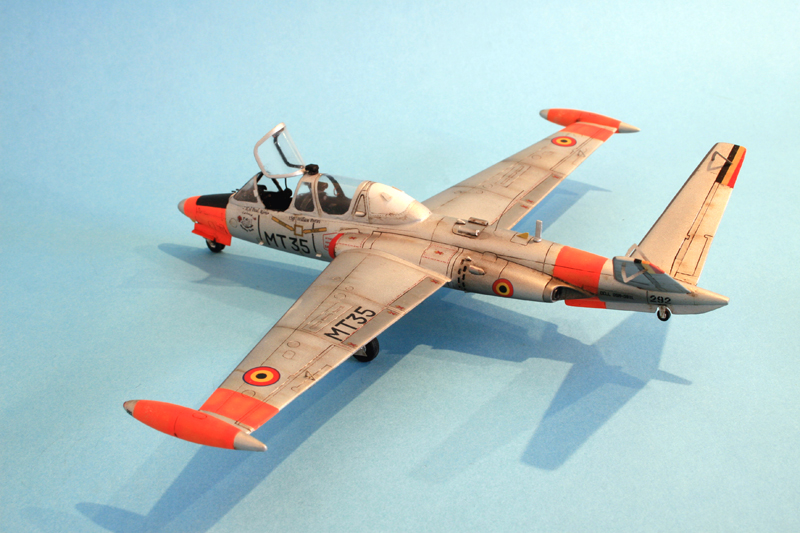
Final result:
Here's the finished result, hopefully this tutorial will illustrate the fact that anybody can give it a shot and start doing his own decals...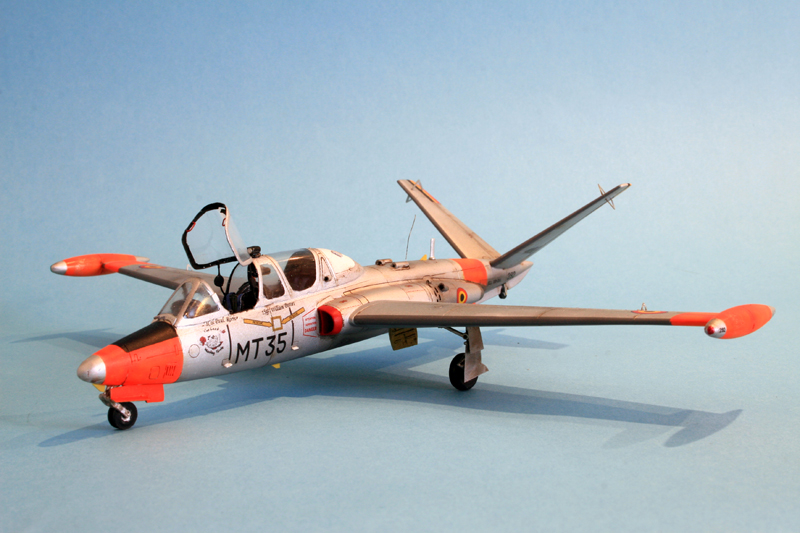
I finally decided to discard the big red text on the wings.
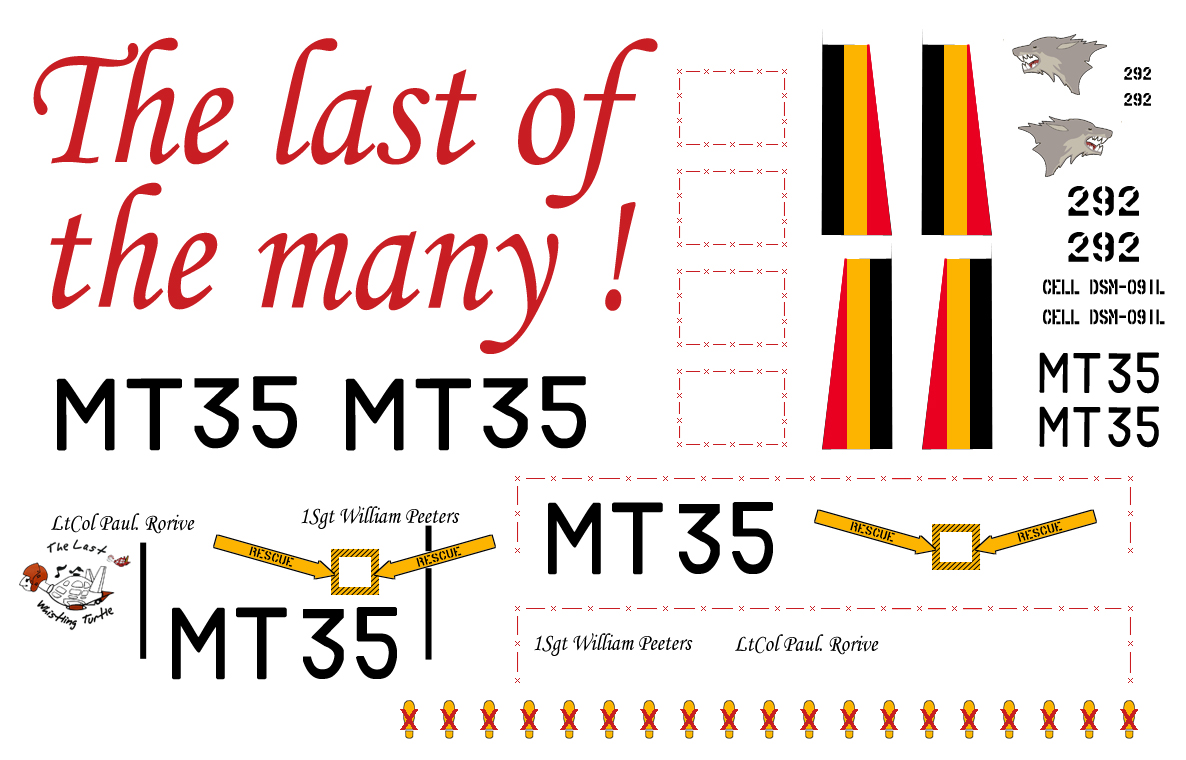
And the decal sheet, realsize in 300dpi
PDF version for those interested:
http://www.ravico.com/ST/models/Fouga_decals/decals_fouga_FINAL.pdf
Model completed in February 2011.